Setup your access
You will need to have either an admin account or an admin to give you the correct credentials on the Iconik system before you can start developing against our REST API.
You will also need a user account that you want to run the REST API as. This user account should be a user on the system that has access to the entities that you wish to work with. Heres how:
- Login to Iconik with a user that has administrative rights
- If you don't already have a user that you want to run the REST API with, create a new user at this point.
- Navigate to the admin interface, and click on settings on the left-hand navigation bar and a sub-menu will open.
- Choose Application Tokens, or click here to open a window to take you to the admin page for the Iconik system this document is being served from.
- Enter a new Application name describing what you will be using the REST API for. i.e. Testing REST API
- Select the username of a user that you wish to run the API as.
- Click Add
- An App-ID and a Token will be generated. Copy the App-ID and the token somewhere safe such as a password manager.
- This is the only time that we will display the token and it can never be retrieved again so copy it somewhere safe.
Recommend REST Clients
This is our un-official recommendations for testing our REST API:
First steps
If you have followed getting started you should have an API-ID and a token. You can use those with a REST client to start using the API.
You will need a REST client that you can change the headers in, some examples are shown on the right. Curl is available on most platforms, and the following example will be shown here.
The following is a curl command you can execute from a terminal which would retrieve the list of storages. Make sure to replace the Auth-Token and App-ID with your own, and change the link from app.iconik.io if you are using another Iconik system:
Curl
curl -X GET --header 'Content-Type: application/json' --header 'Auth-Token: your-token-here' --header 'App-ID: your-app-id-here' 'https://app.iconik.io/API/files/v1/storages/'
Python
import requests
headers = {'App-ID': 'YOUR-APP-ID',
           'Auth-Token': 'YOUR-AUTH-TOKEN'}
r = requests.get('https://app.iconik.io/API/files/v1/storages/', headers=headers)
print(r.status_code)
print(r.text)
Postman
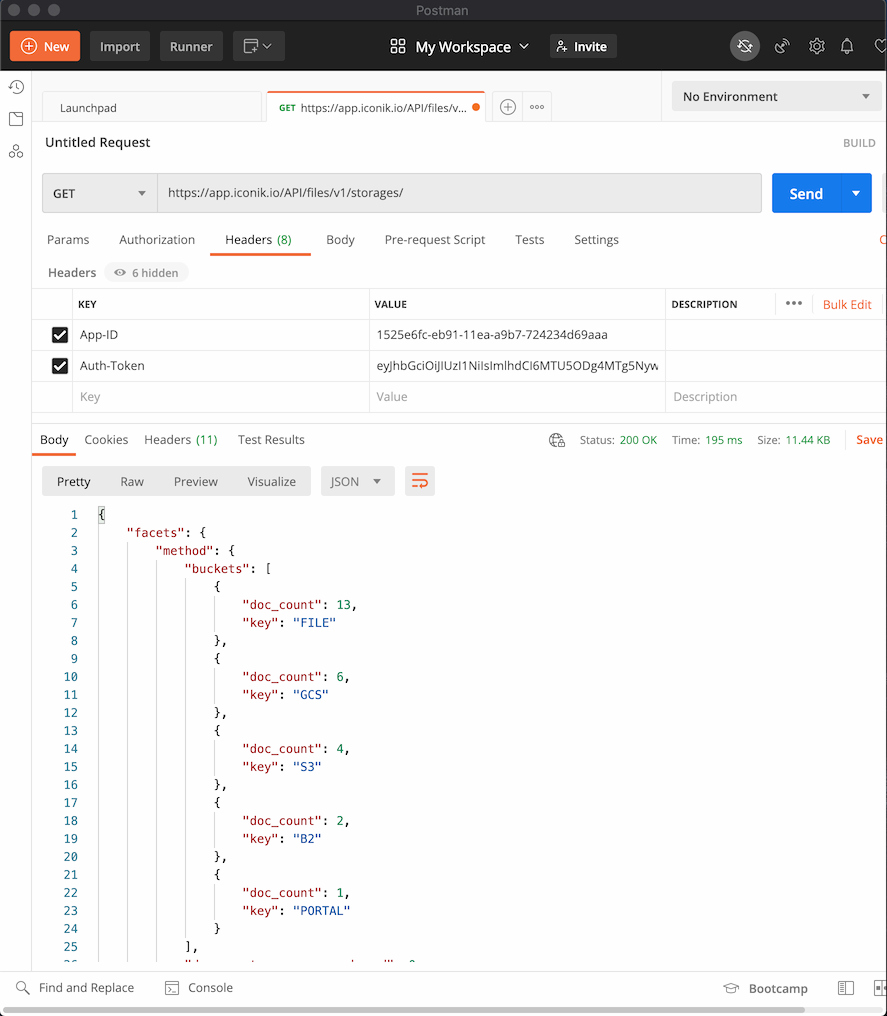
What we did there was to call the API with our authentication parameters, asking Iconik for the list of storages, using version 1 of the API ( v1 ) from the files resource. The list should be presented back in JSON formatting
If you execute the above you should get a JSON payload with details about the storage, which should look similar to:
As you can see it can be fairly long and is designed to be parsed by machine, but it's still readable. There is also some standard information that is used when listing resources:
This details the number of resources in total, the number on this “page”, the number per page and how many pages to help you paginate through longer lists.
The id for each listed resource is also important, as for most resources we can use the ID to then get further information about that resource, for instance a query like:
Curl
curl -X GET --header 'Content-Type: application/json' --header 'Auth-Token: your-token-here' --header 'App-ID: your-app-id-here' 'https://app.iconik.io/API/files/v1/storages/4aa7aca8-d524-11e7-95b7-0a580a3c0236/'
Python
import requests
headers = {'App-ID': 'YOUR-APP-ID',
           'Auth-Token': 'YOUR-AUTH-TOKEN'}
r = requests.get('https://app.iconik.io/API/files/v1/storages/4aa7aca8-d524-11e7-95b7-0a580a3c0236/', headers=headers)
print(r.status_code)
print(r.text)
Postman
Replace the url in the previous example with https://app.iconik.io/API/files/v1/storages/4aa7aca8-d524-11e7-95b7-0a580a3c0236/
Would give us information about the resource 4aa7aca8-d524-11e7-95b7-0a580a3c0236 as called
by /API/files/v1/storages/4aa7aca8-d524-11e7-95b7-0a580a3c0236/
on the server.
Creating an asset
It's time to use the API for creation of resources in Iconik, not just query and see what's already there. The asset is the base container for all media that lives in Iconik and a good place to start. To create an asset using the API you can follow the example below. As previously it is good to keep track of the returned id for later use.
Curl
curl -X POST "https://app.iconik.io/API/assets/v1/assets/" --header 'Content-Type: application/json' --header 'Auth-Token: your-token-here' --header 'App-ID: your-app-id-here' -d "{ \"analyze_status\": \"N/A\", \"archive_status\": \"NOT_ARCHIVED\", \"external_id\": \"string\", \"is_online\": true, \"status\": \"ACTIVE\", \"title\": \"string\", \"type\": \"ASSET\"}"
Python
import requests
headers = {'App-ID': 'YOUR-APP-ID',
  'Auth-Token': 'YOUR-AUTH-TOKEN'}
body = {
  "analyze_status": "N/A",
  "archive_status": "NOT_ARCHIVED",
  "external_id": "string",
  "is_online": True,
  "status": "ACTIVE",
  "title": "string",
  "type": "ASSET",
  }
r = requests.post('https://app.iconik.io/API/assets/v1/assets/', headers=headers, json=body)
print(r.status_code)
print(r.text)
Postman
- Replace the url in the previous example with
'https://app.iconik.io/API/assets/v1/assets/' - Switch HTTP verb from GET to POST
- Paste
{
  "analyze_status": "N/A",
  "archive_status": "NOT_ARCHIVED",
  "external_id": "string",
  "is_online": true,
  "status": "ACTIVE",
  "title": "string",
  "type": "ASSET"
}
as a raw body and choose JSON as type
An answer similiar to this will be returned:
Finding an asset
Let's use the search endpoint to find our recently created asset. To search among assets and sort with most recent first, try this:
Curl
curl -X POST "https://app.iconik.io/API/search/v1/search/" --header 'Content-Type: application/json' --header 'Auth-Token: your-token-here' --header 'App-ID: your-app-id-here' -d "{\"query\": \"string\", \"doc_types\": [\"assets\"], \"sort\": [{\"name\": \"date_created\", \"order\": \"desc\"}]}"
Python
import requests
headers = {'App-ID': 'YOUR-APP-ID',
           'Auth-Token': 'YOUR-AUTH-TOKEN'}
body = {"query": "string", "doc_types": ["assets"],
        "sort": [{"name": "date_created", "order": "desc"}]}
r = requests.post('https://app.iconik.io/API/search/v1/search/', headers=headers, json=body)
print(r.status_code)
print(r.text)
Postman
- Replace the url in the previous example with
'https://app.iconik.io/API/search/v1/search/' - Paste
 {"query": "string",
 "doc_types": ["assets"],
 "sort": [{"name": "date_created", "order": "desc"}]}
as a raw body and choose JSON as type
An answer similiar to this will be returned:
Uploading an image
By uploading an image the entire data model is touched upon. In this example we will
- Create an asset
- Associate a file format and file set
- Choose the default storage location
- Start a upload job
- Actually uploading the file
- Tie all loose ends together
- Clean up
The complete example follows below.
Curl
Example will be added soon...Python
import requests
import json
import datetime
import os

headers = {'App-ID': 'YOUR-APP-ID',
'Auth-Token': 'YOUR-AUTH-TOKEN'}
domain = 'https://app.iconik.io'
file_name = 'goat.jpg'
file_path = '/path/to/your/image/{}'.format(file_name)
file_size = os.path.getsize(file_path)

# asset_id
body = {"title": file_name}
r = requests.post('{}/API/assets/v1/assets/'.format(domain), headers=headers, json=body)
data = json.loads(r.content.decode('utf-8'))
asset_id = data['id']
user_id = data['created_by_user']

# storage_id
r = requests.get('{}/API/files/v1/storages/matching/FILES/'.format(domain), headers=headers)
data = json.loads(r.content.decode('utf-8'))
storage_id = data['id']

# format_id
format_payload = {"user_id": user_id, "name": "ORIGINAL",
"metadata": [{"internet_media_type": "image/jpeg"}], "storage_methods": ["GCS"]}
format_url = '{}/API/files/v1/assets/{}/formats/'.format(domain, asset_id)
r = requests.post(format_url, headers=headers, json=format_payload)
data = json.loads(r.content.decode('utf-8'))
format_id = data['id']

# fileset_id
filesets_url = '{}/API/files/v1/assets/{}/file_sets/'.format(domain, asset_id)
filesets_payload = {"format_id": format_id,
  "storage_id": storage_id, "base_dir": "/",
  "name": file_name, "component_ids": [],
  }
r = requests.post(filesets_url, headers=headers, json=filesets_payload)
data = json.loads(r.content.decode('utf-8'))
fileset_id = data['id']

# get upload url
datetime_now = datetime.datetime.now().isoformat()
file_info = {
  'original_name': file_name,
  'directory_path': "",
  'size': file_size,
  'type': 'FILE',
  'metadata': {},
  'format_id': format_id,
  'file_set_id': fileset_id,
  'storage_id': storage_id,
  'file_date_created': datetime_now,
  'file_date_modified': datetime_now,
  }
files_url = '{}/API/files/v1/assets/{}/files/'.format(domain, asset_id)
r = requests.post(files_url, headers=headers, json=file_info)
data = json.loads(r.content.decode('utf-8'))
upload_url = data['upload_url']
file_id = data['id']
# upload_url = urllib.parse.unquote(data['upload_url'])

# Note start of job
job_json = {"object_type": "assets", "object_id": asset_id, "type": "TRANSFER",
"status": "STARTED", "title": "Upload goat.jpg"}
jobs_url = '{}/API/jobs/v1/jobs/'.format(domain)
r = requests.post(jobs_url, headers=headers, json=job_json)
data = json.loads(r.content.decode('utf-8'))
job_id = data['id']

# make upload calls to storage, e.g. Google storage
google_headers = {
  'accept': 'application/json, text/plain, */*',
  'accept-encoding': 'gzip, deflate, br',
  'accept-language': 'sv-SE,sv;q=0.9,en-US;q=0.8,en;q=0.7,nb;q=0.6,da;q=0.5',
  'content-length': '0',
  'dnt': '1',
  'origin': domain,
  'referer': f'{domain}/upload',
  'x-goog-resumable': 'start',
  }
r = requests.post(upload_url, headers=google_headers)
upload_id = r.headers['X-GUploader-UploadID']

google_headers = {
  'content-length': str(file_size),
  'content-type': 'application/x-www-form-urlencoded',
  'dnt': '1',
  'origin': domain,
  'referer': f'{domain}/upload',
  'x-goog-resumable': 'start',
  'sec-fetch-dest': 'empty',
  'sec-fetch-mode': 'cors',
  'sec-fetch-site': 'cross-site',
  }
with open(file_path, 'rb') as f:
  full_upload_url = upload_url + '&upload_id=' + upload_id
  _ = requests.put(full_upload_url, headers=google_headers, data=f)

# compose url
compose_url = f'{domain}/API/files/v1/assets/{asset_id}/files/{file_id}/multipart/gcs/compose_url/'
compose_json = {"parts_group":None, "content_type":"application/octet-stream"}
_ = requests.post(compose_url, headers=headers, json=compose_json)

# patch files
_ = requests.patch(files_url+f'{file_id}/', headers=headers, json={"status":"CLOSED","progress_processed":100})

# generate keyframes
_ = requests.post(files_url+f'{file_id}/keyframes/', headers=headers)

# Patch job as completed
jobs_url = '{}/API/jobs/v1/jobs/{}/'.format(domain, job_id)
_ = requests.patch(jobs_url, headers=headers, json={"progress_processed":100, "status": "FINISHED"})
Postman
Example will be added soon...Metadata
This section will guide you through the process of creating a custom view and applying it to an asset. Creating a custom view:
Curl
curl -X POST "https://app.iconik.io/API/metadata/v1/views/" -H "accept: application/json" -H "App-ID: YOUR-APP-ID" -H "Auth-Token: YOUR-AUTH-TOKEN" -H "Content-Type: application/json" -d "{ \"description\": \"metadata fields to describe goats\", \"name\": \"Goat\", \"view_fields\": [ { \"auto_set\": null,"{ \"description\": \"metadata fields to describe goats\", \"name\": \"Goat\", \"view_fields\": [ { \"auto_set\": null, \"hide_if_not_set\": null, \"label\": null, \"mapped_field_name\": null, \"name\": \"first_name\", \"read_only\": null, \"required\": null, \"source_url\": null }, { \"auto_set\": null, \"hide_if_not_set\": null, \"label\": null, \"mapped_field_name\": null, \"name\": \"age\", \"read_only\": null, \"required\": null, \"source_url\": null }, { \"auto_set\": null, \"hide_if_not_set\": null, \"label\": null, \"mapped_field_name\": null, \"name\": \"WillEatAnything?\", \"read_only\": null, \"required\": null, \"source_url\": null } ] }"
Python
import requests
headers = {'App-ID': 'YOUR-APP-ID',
'Auth-Token': 'YOUR-AUTH-TOKEN'}
body = {
      "description": "metadata fields to describe goats",
      "name": "Goat",
      "view_fields": [
        {
          "auto_set": None,
          "hide_if_not_set": None,
          "label": None,
          "mapped_field_name": None,
          "name": "first_name",
          "read_only": None,
          "required": None,
          "source_url": None
        },
        {
          "auto_set": None,
          "hide_if_not_set": None,
          "label": None,
          "mapped_field_name": None,
          "name": "age",
          "read_only": None,
          "required": None,
          "source_url": None
        }
      ]
    }
r = requests.post('https://app.iconik.io/API/metadata/v1/views/', headers=headers, json=body)
print(r.status_code)
print(r.text)
Postman
- Set up a POST call to
'https://app.iconik.io/API/metadata/v1/views/' - Paste
 {
      "description": "metadata fields to describe goats",
      "name": "Goat",
      "view_fields": [
        {
          "auto_set": None,
          "hide_if_not_set": None,
          "label": None,
          "mapped_field_name": None,
          "name": "first_name",
          "read_only": None,
          "required": None,
          "source_url": None
        },
        {
          "auto_set": None,
          "hide_if_not_set": None,
          "label": None,
          "mapped_field_name": None,
          "name": "age",
          "read_only": None,
          "required": None,
          "source_url": None
        }
      ]
    }
as a raw body and choose JSON as type
That call will return a json with a field labeled id. To be able to use the view in the web interface that id must be added to the default list. Start by getting all ids in the default list:
Curl
curl -X GET "https://app.iconik.io/API/metadata/v1/assets/categories/" -H "accept: application/json" -H "App-ID: YOUR-APP-ID -H "Auth-Token: YOUR-AUTH-TOKEN"
Python
import requests
import json
headers = {'App-ID': 'YOUR-APP-ID',
'Auth-Token': 'YOUR-AUTH-TOKEN'}
r = requests.get('https://app.iconik.io/API/metadata/v1/assets/categories/', headers=headers)
data = json.loads(r.text)
ids = data['view_ids']
Postman
- Make a GET call to
'https://app.iconik.io/API/metadata/v1/assets/categories/' - Copy the list you get returned.
You will get a json with a field view_ids that looks a bit like this "view_ids": [
"98e2bca2-504a-11e7-aebc-0a580a000282",
"d34e6f1c-d60f-11e9-a8cb-ee0a854c7179",
"13c634de-97a4-11e7-bcd0-0a580a000434",
"edc29974-ebe3-11e8-81e2-0a580a000433",
"07c56980-6cb8-11e7-adee-0a580a000216",
... and to that list you add the id from the previous step. Now you use the extended
list as input to your amended category:
Curl
curl -X POST "https://app.iconik.io/API/metadata/v1/assets/categories/" -H "accept: application/json" -H "App-ID: YOUR-APP-ID" -H "Auth-Token: YOUR-AUTH-TOKEN" -H "Content-Type: application/json" -d "{ \"date_created\": \"2020-09-04T10:51:49.346Z\", \"date_modified\": \"2020-09-04T10:51:49.346Z\", \"label\": \"Assets\", \"name\": \"default\", \"view_ids\": [ \"98e2bca2-504a-11e7-aebc-0a580a000282\", \"d34e6f1c-d60f-11e9-a8cb-ee0a854c7179\", \"13c634de-97a4-11e7-bcd0-0a580a000434\", \"edc29974-ebe3-11e8-81e2-0a580a000433\", \"07c56980-6cb8-11e7-adee-0a580a000216\", \"a29a4d36-9fb3-11e8-aed8-0a580a00011a\", \"c9bd1066-965f-11e9-8935-e663b564b1fb\", \"991192b6-504a-11e7-8d3f-0a580a000282\", \"84e38664-d922-11e8-a186-0a580a00014e\", \"939e9e08-ee9c-11ea-800e-f2989a240442\", \"ee094b26-bf40-11e7-ae64-0a580a00061a\", \"db68a934-9490-11e7-85ba-0a580a000426\", \"6dabf714-09eb-11e8-85dd-0a580a00032c\", \"05a2a4bc-6dd9-11ea-91f6-26768094427d\", \"99348acc-504a-11e7-af1c-0a580a000282\" ]}"
Python
#continued from above
ids.append('your-id-from-first-step')
body = {"date_created": "2020-09-04T10:51:49.346Z",
  "date_modified": "2020-09-04T10:51:49.346Z",
  "label": "Assets",
  "name": "default",
  "view_ids": ids}
r = requests.post('https://app.iconik.io//API/metadata/v1/assets/categories/', headers=headers, json=body)
print(r.status_code)
print(r.text)
Postman
- Set up a POST call to
'https://app.iconik.io//API/metadata/v1/assets/categories/' - Paste
 {"date_created": "2020-09-04T10:51:49.346Z",
  "date_modified": "2020-09-04T10:51:49.346Z",
  "label": "Assets",
  "name": "default",
  "view_ids": ids}
as a raw body and choose JSON as type - Replace ids with the list (all the ids and the square brackets surrounding them) and add your id from the first step to the end of the list.
You can now use the view as metadata for assets in the web GUI or update it using the API as below:
Curl
curl -X PUT "https://app.iconik.io/API/metadata/v1/{ASSET-ID-FROM-BEFORE}/views/{VIEW-ID-FROM-BEFORE}/" -H "accept: application/json" -H "App-ID: YOUR-APP-ID" -H "Auth-Token: YOUR-AUTH-TOKEN" -H "Content-Type: application/json" -d "{\"metadata_values\":{\"first_name\":{\"field_values\":[{\"value\":\"Goaters\"}]},\"age\":{\"field_values\":[{\"value\":\"3\"}]}}}"
Python
body = {"metadata_values":{"first_name":{"field_values":[{"value":"Goaters"}]},"age":{"field_values":[{"value":"3"}]}}}
r = requests.put('https://app.iconik.io/API/metadata/v1/assets/{ASSET-ID-FROM-BEFORE}/views/{VIEW-ID-FROM-BEFORE}/', headers=headers, json=body)
print(r.status_code)
print(r.text)
Postman
- Set up a PUT call to
'https://app.iconik.io/API/metadata/v1/assets/{ASSET-ID-FROM-BEFORE}/views/{VIEW-ID-FROM-BEFORE}/' - Paste
{"metadata_values":{"first_name":{"field_values":[{"value":"Goaters"}]},"age":{"field_values":[{"value":"3"}]}}}as a raw body and choose JSON as type
Webhooks
To set up a web hook that forwards changes of assets you can do like this:
Curl
curl -X POST "https://app.iconik.io/API/webhooks/v1/webhooks/" -H "accept: application/json" -H "Auth-Token: YOUR-AUTH-TOKEN" -H "App-ID: YOUR-APP-ID" -H "Content-Type: application/json" -d "\"event_type\":\"assets\",\"operation\":\"update\",\"realm\":null,\"status\":\"ENABLED\",\"url\":\"https://iconik-logger.herokuapp.com/\"}"
Python
body = {"event_type":"assets","operation":"update","realm":null,"status":"ENABLED","url":"https://iconik-logger.herokuapp.com/"}
r = requests.post('https://app.iconik.io/API/notifications/v1/webhooks/', headers=headers, json=body)
print(r.status_code)
print(r.text)
Postman
- Set up a POST call to
'https://app.iconik.io/API/notifications/v1/webhooks/' - Paste
{"event_type":"assets","operation":"update","realm":null,"status":"ENABLED","url":"https://iconik-logger.herokuapp.com/"}as a raw body and choose JSON as type
The POST request will return something similar to:
  {
    "id": "e5f48626-f0d7-11ea-8a46-eecfc44550a5",
    "status": "ENABLED",
    "date_created": "2020-09-07T07:01:05.486423+00:00",
    "event_type": "assets",
    "url": "https://iconik-logger.herokuapp.com/",
    "operation": null,
    "object_id": null,
    "realm": null,
    "date_modified": "2020-09-07T07:01:05.486423+00:00"
  }
In the example above the endpoint https://iconik-logger.herokuapp.com/ was set up to receive POST requests as the webhook and dumnp the message body to the logs. The message sent by the webhook will look similar to this:
  {
      "system_domain_id": "YOUR-SYSTEM-DOMAIN-ID",
      "object_id": "6ce31914-eddf-11ea-b571-0af7c14f78f9",
      "realm": "metadata",
      "operation": "update",
      "data": {
          "version_id": "6ce381b0-eddf-11ea-b571-0af7c14f78f9",
          "metadata_values": {
              "first_name": {
                  "field_values": [
                      {
                          "value": "Poaters"
                      }
                  ],
                  "date_created": "2020-09-07T06:45:41.979412+00:00"
              }
          },
          "object_type": "assets",
          "object_id": "6ce31914-eddf-11ea-b571-0af7c14f78f9"
      },
      "request_id": "90762250227cb0d5e0a7a37b806b3a04",
      "event_type": "assets"
  }
And in that response you can see that the goats name has been changed to Poaters. Now the service can act accordingly.
Rate Limiting
The Iconik APIs use rate limiting to prevent individual users to negatively impact other users of the system. The rate limiting is done per authenticated user and application token, so you should use separate application tokens for each application you integrate with Iconik to prevent them from interfering with each other.
Each API response includes a http header RateLimit-Remaining which contains the number of requests remaining until the rate limiting will start blocking requests. The Iconik rate limiting uses a Leaky Bucket Algorithm where we allow 50 requests per second sustained or 1000 requests over any 20 second period.
Once the rate limit has been reached Iconik will respond with a http response 429 Too Many Requests telling you to slow down the response. If you encounter such a response you should back off and retry the request after a few seconds.
Next Steps
If you have followed the above please feel free to try this:
- Try doing the above using PostMan or another GUI, then try using a programming language.
- Look at the API reference documentation. This will give you a complete view of all the API endpoints for Iconik, plus more information on what to expect.
- Checkout how Iconik can call your server or service using Webhooks as and when events happen within Iconik
- View our best practices on keeping your application and your information stored on Iconik secure by following our Security guidelines
- Let us know when you build something awesome!